This week I created a shoe-lover’s dream! A shoe… cake!

When a return customer contacted me to order a cake for his wife, I was thrilled because, as I told him, I love making grown-up girl celebration cakes! He then told me about his wife’s love for shoes and I knew this would be a fun one.

I had just one week prior seen an amazing magnetic shoe mold via a YouTube video and had to pull my finger away from the purchase button about three times, reminding myself that I had no immediate use for it. Side note: does anyone else find humor in the fact that I had to use self control not to buy a shoe mold?? That is a true cake decorator for you! I will count my husband lucky (and we won’t discuss my handbag addiction). 😉

Anyway, I immediately jumped back online and grabbed the shoe mold that had been my heart’s desire. When it arrived, I eagerly sliced open the box and ran downstairs to my bakery, and it only took me one wasted try before I found success!

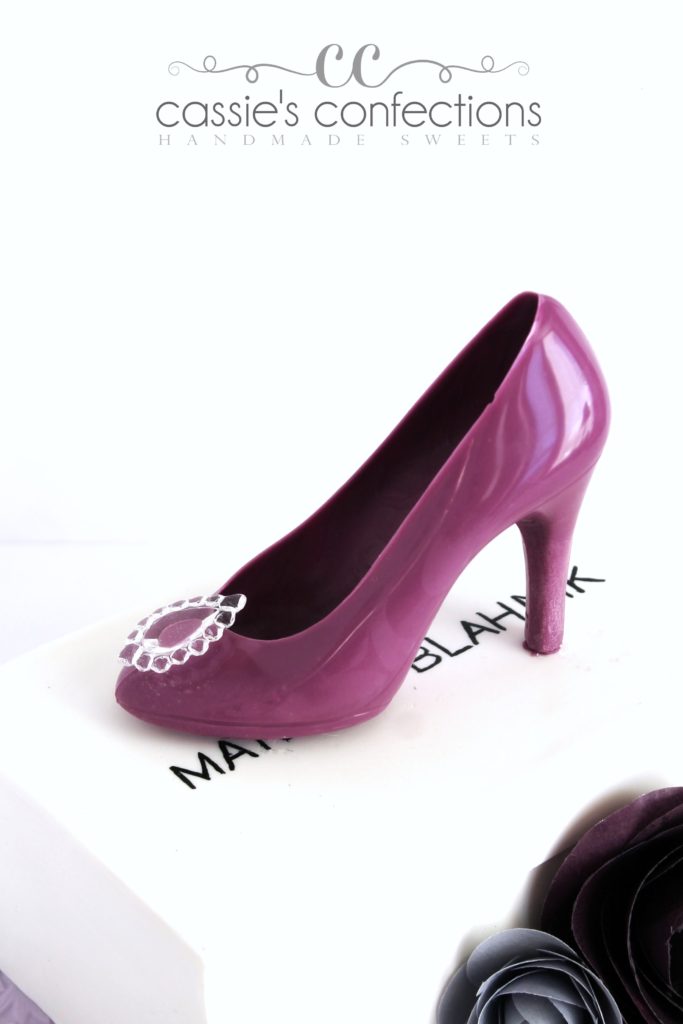
Isn’t that a seriously gorgeous, shiny, smooth piece of chocolate “designer” footwear? I added the edible jewel for more wow, and I’m really not sure if I wanted to eat it or wear it! Hopefully my customer felt conflicted in the same way.

I then created a “shoebox” cake in a similar manner to how I created last week’s chocolate box cake (you can watch the video here), but with modeling chocolate since my customer is not the biggest fan of fondant. I did a 50/50 mixture of modeling chocolate and fondant only for the top panel in order to be able to paint the logo on the top (food coloring beads up on modeling chocolate).

I used the fabulous wafer paper rose tutorial from Cakeheads.com to add a beautiful detail next to the shoe box. I printed my wafer paper two shades of purple using my edible printer.

I put the cake on a textured fondant cake board and was done!

This cake made my eyes happy!

Tools used in this project:

Classes you might enjoy:

It always amazes me how quickly Valentine’s Day comes after the new year starts! It usually arrives with the surprise of just how much needs to be done to plan for four kids’ worth of Valentines parties, and with that usually with the fact that I did not account for said parties when booking my cake schedule.

However, this year I was able to plan ahead just a bit and create a super fun treat just for fun!

I took a beautiful box of chocolates that I purchased and used it as my inspiration for a cake!

With some fondant, gum paste and edible lace, I was able to create an adorable cake that looks like a box of chocolates.

This would be such a fun gift for any loved one in your life, and such a fun sell to clients looking for a special themed treat!

Due to allergies of the ones I created this for, I stuck with basic inside flavors… but think of the possibilities! Chocolate upon chocolate… maybe even chocolates in your filling!

Please enjoy the video tutorial I created of this cake! If you do get creative with it, I would love to see your photos!

I am quite sure my little loves with enjoy this cake this weekend!

Supplies used in this project:

Here we are again, on a lovely Sunday with a few extra moments (finally!) to write!

It seems that 2017 has so far been about facing my (cake) fears! Which is good! In my life, a fear will nag at me incessantly until I finally stand up and deal with it, so cakes will be no different.

I have dabbled with airbrushing in bits and pieces, while learning to adjust the settings on my airbrush and test out the colors.

I’ve also done an entire white fondant cake into dark colors, such as this style. (This works wonderfully well as a way to avoid black or dark fondant or buttercream!)

I won’t deny that the cake above is really pretty and somewhat impressive looking, but it does come at a price! That would be me, heart pounding, hands shaking, second guessing and panicking.

This week, I once again decided to give another little push at my discomfort towards airbrushing. While I know that I am creative, I feel that I am creative in a structured design aspect as opposed to a wild artist aspect, so painting and things that are more artistic can sometimes throw me a bit. Such is the way with airbrushing. When other cake artists airbrush, I see gorgeous, vibrant colors spraying wildly at a cake and turning it into a stunning canvas of perfectly dispersed color molecules.

But when I airbrush? Ugh… not so much!

However, I do see the potential of an airbrushed cake and I’m determined to at least partially master it.

This week, my biggest project was an electric guitar cake! Not just any electric guitar – the specific one that the birthday boy owned. And it was not just a plain old guitar, but one with a detailed pattern and colors. This one!

I knew right off the bat that some airbrushing was going to be needed. After much brainstorming and mulling it over with my husband (which I do often), I decided to use fondant to create a similar design pattern and airbrush the color to achieve the purple edge effect.

It was not without it’s challenges (never forget that any lumps and bumps in your surface pick up airbrush color), and I am positive there is a purple layer of color dust coating my entire bakery, but it turned out pretty well!

All the tiny edible details were super fun to create. I chose to go with silver floral wire for the strings. I decided that it was more important to me that they look realistic than be completely edible, and I was quite happy with my choice.

Due to the amount of servings needed, I chose to create the neck and head of this guitar out of foam core covered with fondant and other edible elements (please, no angry musicians being mad at me for my lack of guitar knowledge and terminology!) and propped up by clear bubble tea straws (which you can see in this photo).

Oh, and the wooden board that this guitar is sitting on is actually a silver cake drum covered with white fondant and decorated/painted, and you might notice that I use this look quite often on my cake boards. If anyone is interested in learning how I create this, let me know and I will put something together!

I hope this musician had an awesome day!

Supplies used in this project:

Classes you might like:

Some of the most eye-catching photos floating around social media these days include non-edible items made edible. People are fascinated by the ability to turn a regular item into cake! As a cake decorator, it is so fabulously satisfying to have someone say, “I can’t believe that is cake!”

However, when I hear comments such as these, it is usually regarding the smoothness of my fondant or the sharpness of my buttercream edges, as opposed to the realistic quality of my decorations or design. Admittedly, I am a round cake kind of girl. I love a gorgeous round cake with straight sides and sharp edges… tier after tier of traditionally beautiful cakes make me swoon.

But I have to admit… lately I’ve been eyeing the amazing designs of realistic and novelty cakes and wishing I could steal a little bit of that talent!

So… since I’m not the type of person to stay where I am and never move forward, I decided to step a little bit out of my comfort zone for my daughter’s third birthday cake this year. While I think traditionally classic cakes will always be my true love, I did enjoy a bit of carving, shaping and imitating real objects on this one!

My daughter LOVES to color, so we went with a coloring theme! I decided to try to create a coloring book cake!

As I started to create, I got that familiar tingle of excitement and took the idea further, deciding to create a cake that she could actually color on. I found some fabulous printable coloring sheets created by SamanthaBDesign on Etsy and printed them with my edible printer.

And then I became even more ambitious and chose to create the crayon box out of cake as well!

As I was staring at the finished cake at 10:30 p.m. at night (because that’s how my own kids’ cakes always go), I knew that there was no possibility of me being satisfied with this cake if I did not create a couple of edible crayons to embellish the final product.

And then I knew I was done! I loved it! It did not come easy… me carving cake is nothing like those awesome videos you see on YouTube… more like a disaster of cake and frosting and the occasional sweat and tears. But when I finished my design, I was pretty pleased!

The best part was bringing my baby girl to her cake while her daddy covered her eyes, and then seeing her looking around confused and wondering where her cake was! She didn’t realize the coloring set in front of her was her cake! Once we pointed it out to her, she immediately tried to pick up one of the edible crayons to color!

In case you’re wondering, she did color her cake at the party (with edible markers). She loved every minute of it, even coloring so long that part of the cake started to get smooshed!

She wasn’t even sad when we cut into it, because… well… she loves cake. <3

Tools used in this project: