Happy May Day, my sweet friends!

Oh my goodness, how life has gotten away from me these last couple of months! Between four kids and their busy schedules, my husband traveling for work and more glorious orders than I know what to do with (because, let’s face it, it’s hard to say no!) I’ve been too busy to write.

But here I am.

This past week was one of those weeks that I adore… with nothing but the most fun projects on my plate. If you know me, you know that I love the beautiful, elegant, feminine, detailed and clean designs the very most. So a week full of these types of orders brings me great joy.

There was one cake in particular this week that I couldn’t get enough of.

Isn’t she a beauty?

The precision of the elegant striped bottom tier appealed to all my senses. I used my upside down method (similar to this video) to create the most perfect seamless stripes.

In order to create stripes of similar thickness in both colors, I rolled out long strips of each color and then laid them side by side and rolled them simultaneously. This gives a smooth, flat appearance on the tier. Perfection.

The elegant monogram encircled with black pearls on the top tier and the gold pearls around the bottom tier added a touch of class.

What is it about a gorgeous monogram that can bring anything to the next level? The way the swirled gold “M” catches the light…

The coral and gold floral arrangement wrapping gracefully around the middle of this cake adds a beautiful change in texture and a gorgeous pop of color. The gold leaves and centers create a bit of elegance and help to blur the line between naturalistic and whimsical.

The clean lines on this cake are so pleasing to the eye, and the sugar on the board at the base of the cake adds a bit of sparkle to complete this design.

Every once in a while, a cake is born in my bakery that makes me feel especially satisfied… this is one.

I hope you love this cake as much as I did.

On another note…

If you would love to know exactly how I created the striped bottom tier, I will consider creating a video tutorial for my YouTube channel. Please leave me a comment below and let me know!

I’ll admit, I’ve been feeling a bit confused lately, my friends! I want to know just who my audience is.

Are you a cake decorator watching videos and reading blog posts for fun? Are you watching or reading them to learn? Are you someone who just enjoys beautiful photos? Are you someone who just loves those mesmerizing cake and cookie videos floating around online?

Please let me know who you are, so that I know what to create for you and how.

Tools used in this project:
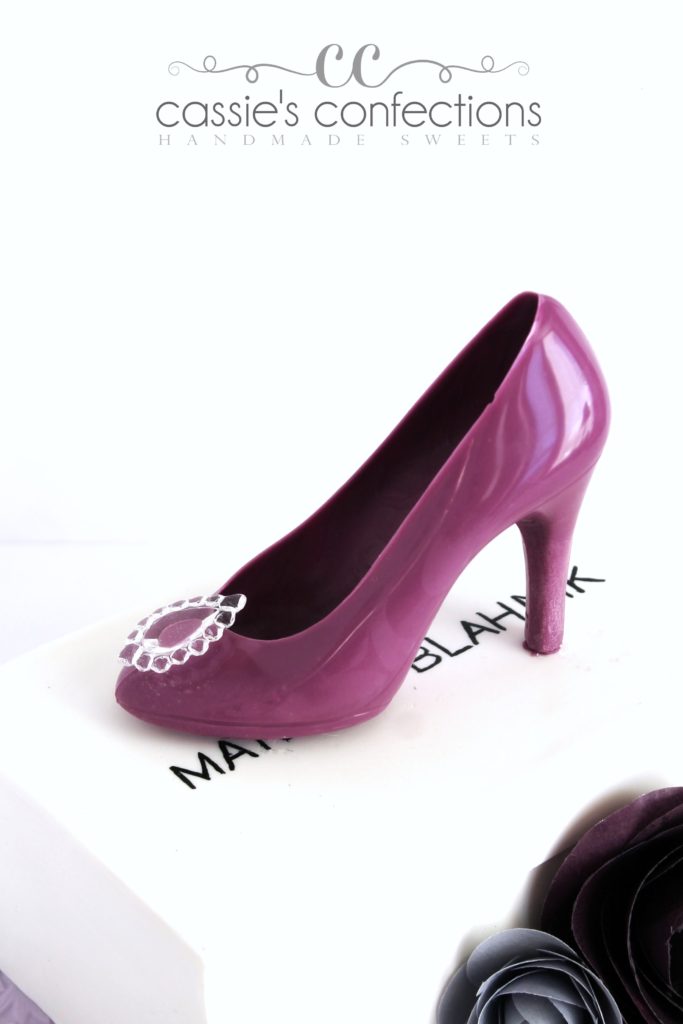
This week I created a shoe-lover’s dream! A shoe… cake!

When a return customer contacted me to order a cake for his wife, I was thrilled because, as I told him, I love making grown-up girl celebration cakes! He then told me about his wife’s love for shoes and I knew this would be a fun one.

I had just one week prior seen an amazing magnetic shoe mold via a YouTube video and had to pull my finger away from the purchase button about three times, reminding myself that I had no immediate use for it. Side note: does anyone else find humor in the fact that I had to use self control not to buy a shoe mold?? That is a true cake decorator for you! I will count my husband lucky (and we won’t discuss my handbag addiction). 😉

Anyway, I immediately jumped back online and grabbed the shoe mold that had been my heart’s desire. When it arrived, I eagerly sliced open the box and ran downstairs to my bakery, and it only took me one wasted try before I found success!

Isn’t that a seriously gorgeous, shiny, smooth piece of chocolate “designer” footwear? I added the edible jewel for more wow, and I’m really not sure if I wanted to eat it or wear it! Hopefully my customer felt conflicted in the same way.

I then created a “shoebox” cake in a similar manner to how I created last week’s chocolate box cake (you can watch the video here), but with modeling chocolate since my customer is not the biggest fan of fondant. I did a 50/50 mixture of modeling chocolate and fondant only for the top panel in order to be able to paint the logo on the top (food coloring beads up on modeling chocolate).

I used the fabulous wafer paper rose tutorial from Cakeheads.com to add a beautiful detail next to the shoe box. I printed my wafer paper two shades of purple using my edible printer.

I put the cake on a textured fondant cake board and was done!

This cake made my eyes happy!

Tools used in this project:

Classes you might enjoy:

Here we are again, on a lovely Sunday with a few extra moments (finally!) to write!

It seems that 2017 has so far been about facing my (cake) fears! Which is good! In my life, a fear will nag at me incessantly until I finally stand up and deal with it, so cakes will be no different.

I have dabbled with airbrushing in bits and pieces, while learning to adjust the settings on my airbrush and test out the colors.

I’ve also done an entire white fondant cake into dark colors, such as this style. (This works wonderfully well as a way to avoid black or dark fondant or buttercream!)

I won’t deny that the cake above is really pretty and somewhat impressive looking, but it does come at a price! That would be me, heart pounding, hands shaking, second guessing and panicking.

This week, I once again decided to give another little push at my discomfort towards airbrushing. While I know that I am creative, I feel that I am creative in a structured design aspect as opposed to a wild artist aspect, so painting and things that are more artistic can sometimes throw me a bit. Such is the way with airbrushing. When other cake artists airbrush, I see gorgeous, vibrant colors spraying wildly at a cake and turning it into a stunning canvas of perfectly dispersed color molecules.

But when I airbrush? Ugh… not so much!

However, I do see the potential of an airbrushed cake and I’m determined to at least partially master it.

This week, my biggest project was an electric guitar cake! Not just any electric guitar – the specific one that the birthday boy owned. And it was not just a plain old guitar, but one with a detailed pattern and colors. This one!

I knew right off the bat that some airbrushing was going to be needed. After much brainstorming and mulling it over with my husband (which I do often), I decided to use fondant to create a similar design pattern and airbrush the color to achieve the purple edge effect.

It was not without it’s challenges (never forget that any lumps and bumps in your surface pick up airbrush color), and I am positive there is a purple layer of color dust coating my entire bakery, but it turned out pretty well!

All the tiny edible details were super fun to create. I chose to go with silver floral wire for the strings. I decided that it was more important to me that they look realistic than be completely edible, and I was quite happy with my choice.

Due to the amount of servings needed, I chose to create the neck and head of this guitar out of foam core covered with fondant and other edible elements (please, no angry musicians being mad at me for my lack of guitar knowledge and terminology!) and propped up by clear bubble tea straws (which you can see in this photo).

Oh, and the wooden board that this guitar is sitting on is actually a silver cake drum covered with white fondant and decorated/painted, and you might notice that I use this look quite often on my cake boards. If anyone is interested in learning how I create this, let me know and I will put something together!

I hope this musician had an awesome day!

Supplies used in this project:

Classes you might like:

Wow, I’ve been busy lately!

Between orders and family, I’ve been neglecting my blog and all of my social media! I’m hoping to become a bit more active again after this week’s trip to Texas!

I have some awesome photos to share with you. First: cake!

This week, I was able to create a Brave-inspired cake. I have been challenging myself lately to get out of the rut of creating the same old cakes that are everywhere in the cake world… you know – the Minnie/Mickey Mouse ones, the Buzz Lightyears and various buttercream ruffles. I’m listing these ones because I’ve done them. Not to insult any of those cakes (if I did them for you), as I tried to add my own touches and make them as clean as possible so that you could have a unique version and I could still feel proud, but my heart is yearning for my own style to emerge. I am just trying to figure out how to allow this to happen.

This Brave cake was a great start for me! I chose to NOT search out the internet for ideas and inspiration as I normally do. Thanks to Kara’s Couture Cakes for that bit of advice… it’s too easy to have a cake become just another cake because of the other cake images that you can never erase from your mind once you’ve seen them.

I also did not want to violate any copyrights by using logos or exact characters, so I literally closed my eyes and thought through the main details of the movie that stuck out to me. I came up with a few things… Merida’s turquoise and green dresses, hair, the wisps, tapestry and her bow and arrow (luckily, the bow and arrow were my client’s one creative request).

After brainstorming, playing the workability of ideas out in my head, considering the budget my client wanted to stay within (not that I would not want to give it my all but some of those ideas would be very time-consuming), considering the limitations of my medium (my client wanted buttercream), I settled on a design.

I put my design together, and here was the result…

brave-cake-final

I was pleased!

I took special care with the bow and arrow, as this was the birthday girl’s one request.

bravecaketoppers

The bow and arrow are created with gumpaste. The only non-edible item was the twine used as the string. Sadly, the exposure makes it so that you can’t see in the photo that I created the feather on the end of the bow using wafer paper.

Afterwards, I decided to peek around online and discovered that the tie is not the most original idea, but I definitely gave it some beautiful detail and feel proud of it for that reason! I think little Olivia was pleased!

graphic

And now for another exciting part of my last few weeks!

If you follow me on Facebook or Instagram, you may have already seen my beautiful new kitchen that my husband surprised me with!

bakerymainwall

bakeryovensandcloset

bakeryovens

bakeryworkspace

bakerylogo

Amazing, right?? I have the best, most supportive husband in the world.

So this is the new Cassie’s Confections bakery! Being in my own beautiful space has already been so inspiring!

Lastly, I read on a cake blog once that part of my online presence should include a bit of personal information, as people want to know me. I don’t usually do this, but I am taking it to heart this time and sharing a recent achievement that I am so proud of!

I have been training in Taekwondo for five years now. I started training with my dad (a black belt) and over time, three of my littles have joined me. They have so far achieved their red, blue, and white belt with yellow stripes. A couple of weeks ago, I earned my 2nd degree black belt!

belt

Here is one aspect of my test – I broke 3 boards at one time with a step-behind side kick.

middle

I love this special activity and exercise that I can do with my babies, and I truly believe that training AND cakes keep me motived for each other in a way.

Anyway, I’d love to hear your comments or questions on anything in this post! I’m hoping to get more videos up on YouTube soon, as my subscriber list is growing slowly but pretty steadily (if you have any video requests, please let me know!)! If you haven’t already subscribed, please do so here!

Cassiesignature

Some supplies used in this project:

Classes you might enjoy:

betterbuttercream

Hello, sweet friends!

I was scrolling down through some of my older photos and feeling like I was watching myself grow while doing so… all of my cakes, from the very oldest until now. I would like to think that there was not much difference, and maybe tell myself that I was always good at cakes – but that is, of course, not the case.

One thing I do notice right off the bat is the fact that it took me about a year or so to realize the importance of decorating my cake boards.

pinkleopardcakewm

Whether it is something as simple as sanding sugar…

Doctorgradcake

… or even a solid fondant with a message on it, I always try to at least cover my boards.

As I’ve grown in confidence as a cake designer, I have gotten more and more fancy with my boards.

princessjasminecaketopwm

I’ve learned how much extra detail and character it adds to the cake. I’ve even gone as far as the create a board that almost overshadows the cake itself.

beerfootballcaketopwm

Fellow bakers, if you want to feel worth the money you know you should be charging, you need to take care every detail of your cake… this definitely includes the board. A beautifully decorated board adds so much to the quality of your cake!

cigarcakecohibawm

Really… just take my word for it.

vintagehollywoodcakecupcakeswm2

But if you still need a little more convincing, check out this video by Liz Merrick that convinced me I was right.

I would love to know your thoughts!

Cassiesignature