This week I created a shoe-lover’s dream! A shoe… cake!

When a return customer contacted me to order a cake for his wife, I was thrilled because, as I told him, I love making grown-up girl celebration cakes! He then told me about his wife’s love for shoes and I knew this would be a fun one.

I had just one week prior seen an amazing magnetic shoe mold via a YouTube video and had to pull my finger away from the purchase button about three times, reminding myself that I had no immediate use for it. Side note: does anyone else find humor in the fact that I had to use self control not to buy a shoe mold?? That is a true cake decorator for you! I will count my husband lucky (and we won’t discuss my handbag addiction). 😉

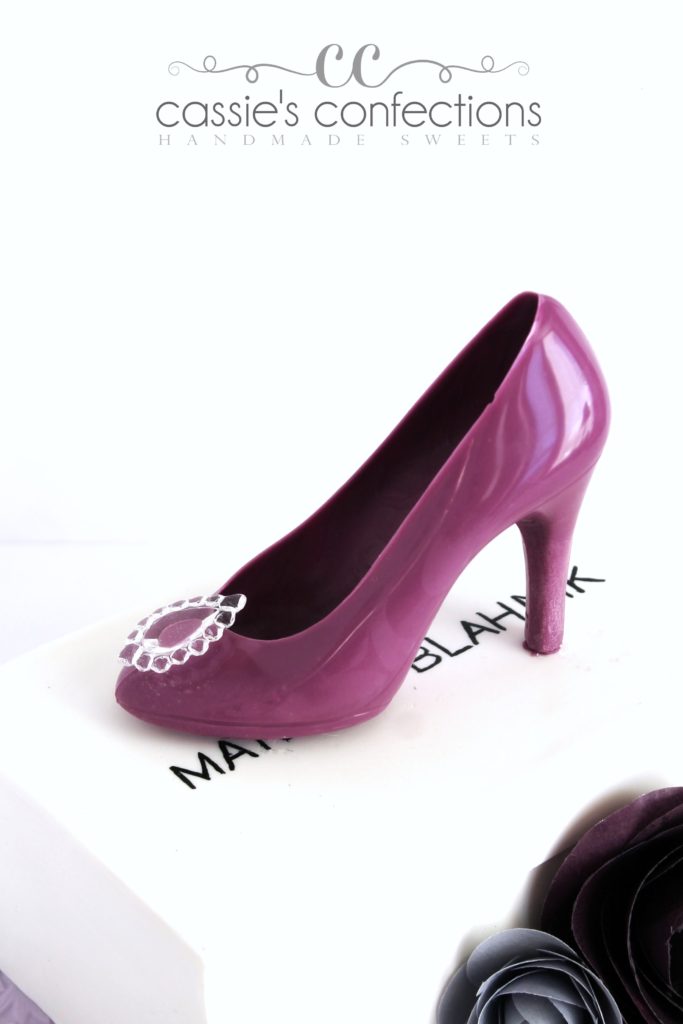
Anyway, I immediately jumped back online and grabbed the shoe mold that had been my heart’s desire. When it arrived, I eagerly sliced open the box and ran downstairs to my bakery, and it only took me one wasted try before I found success!

Isn’t that a seriously gorgeous, shiny, smooth piece of chocolate “designer” footwear? I added the edible jewel for more wow, and I’m really not sure if I wanted to eat it or wear it! Hopefully my customer felt conflicted in the same way.

I then created a “shoebox” cake in a similar manner to how I created last week’s chocolate box cake (you can watch the video here), but with modeling chocolate since my customer is not the biggest fan of fondant. I did a 50/50 mixture of modeling chocolate and fondant only for the top panel in order to be able to paint the logo on the top (food coloring beads up on modeling chocolate).

I used the fabulous wafer paper rose tutorial from Cakeheads.com to add a beautiful detail next to the shoe box. I printed my wafer paper two shades of purple using my edible printer.

I put the cake on a textured fondant cake board and was done!

This cake made my eyes happy!

Tools used in this project:

Classes you might enjoy:

Have you ever created a cake that was a hit… and were then asked to recreate it later on? Me too… often.

I was a hairstylist for 10 years and also did wedding hair for much of that time. Eventually, I gave up the wedding hair part of it for a specific reason. It wasn’t that I didn’t enjoy the updos – I loved them! I would meet with the bride for her practice hair appointment and all would go just swell. Frustratingly, though, I would go to recreate the updo on the wedding day and struggle with it. Every. Single. Time. I felt like the wedding day hair was never as good as the practice hair… but what bride is willing to forgo the practice session? So, I eventually dropped that from my hair menu.

I find that recreating cakes can be the same level of difficulty for me at times. It’s not like I take step by step measurements and notes all along the way, so my colors might turn out slightly different or my sizes may vary. It has taken me some getting used to stepping back and re-entering the initial design mode that allowed me to create the first one.

You might remember this cake:

With it’s soft, hand-painted look and classic appeal, this cake was a blast and a favorite.

I was asked to recreate this cake and was excited to do so! My customer wanted some changes made, however… she wanted this cake turned into a two-tier and with more characters included. Begin the design process once again!

How was I going to tie the beehive at the top in with a two-tier cake, and how was I going to include the characters and the classic storybook sky without having one big open sky tier?

I decided to go with one of my favorite parts of the classic storybook… when Pooh “rides” a balloon up to the beehive in the tree.

Being that this was a birthday cake, I decided to ahead and bring the birthday balloon theme in as well, and as a way to tie the other characters in to the overall theme of the cake.

And of course I included the birthday boy’s name on top.

Overall, I was pleased with this cake!

I could definitely pick on the details… of course I have already. I could be worried that the colors are too vibrant, or that my blue sky sponge effect turned out a bit differently than last time. I could go on.

But this is where I’m going to learn that each cake IS actually a different project, with previous cakes only as inspiration.

Just as we strive to avoid copying another cake designer’s work exactly, I’m going to decide that we should do the same with our own work. I would say Pooh cake 2.0 turned out fabulously, right down to it’s tiny wafer paper bee wings!

Oh, and bonus:

A cute little coordinating smash!

Merry Christmas a few days early, my friends!

Tools used in this project:

Wow, I’ve been busy lately!

Between orders and family, I’ve been neglecting my blog and all of my social media! I’m hoping to become a bit more active again after this week’s trip to Texas!

I have some awesome photos to share with you. First: cake!

This week, I was able to create a Brave-inspired cake. I have been challenging myself lately to get out of the rut of creating the same old cakes that are everywhere in the cake world… you know – the Minnie/Mickey Mouse ones, the Buzz Lightyears and various buttercream ruffles. I’m listing these ones because I’ve done them. Not to insult any of those cakes (if I did them for you), as I tried to add my own touches and make them as clean as possible so that you could have a unique version and I could still feel proud, but my heart is yearning for my own style to emerge. I am just trying to figure out how to allow this to happen.

This Brave cake was a great start for me! I chose to NOT search out the internet for ideas and inspiration as I normally do. Thanks to Kara’s Couture Cakes for that bit of advice… it’s too easy to have a cake become just another cake because of the other cake images that you can never erase from your mind once you’ve seen them.

I also did not want to violate any copyrights by using logos or exact characters, so I literally closed my eyes and thought through the main details of the movie that stuck out to me. I came up with a few things… Merida’s turquoise and green dresses, hair, the wisps, tapestry and her bow and arrow (luckily, the bow and arrow were my client’s one creative request).

After brainstorming, playing the workability of ideas out in my head, considering the budget my client wanted to stay within (not that I would not want to give it my all but some of those ideas would be very time-consuming), considering the limitations of my medium (my client wanted buttercream), I settled on a design.

I put my design together, and here was the result…

brave-cake-final

I was pleased!

I took special care with the bow and arrow, as this was the birthday girl’s one request.

bravecaketoppers

The bow and arrow are created with gumpaste. The only non-edible item was the twine used as the string. Sadly, the exposure makes it so that you can’t see in the photo that I created the feather on the end of the bow using wafer paper.

Afterwards, I decided to peek around online and discovered that the tie is not the most original idea, but I definitely gave it some beautiful detail and feel proud of it for that reason! I think little Olivia was pleased!

graphic

And now for another exciting part of my last few weeks!

If you follow me on Facebook or Instagram, you may have already seen my beautiful new kitchen that my husband surprised me with!

bakerymainwall

bakeryovensandcloset

bakeryovens

bakeryworkspace

bakerylogo

Amazing, right?? I have the best, most supportive husband in the world.

So this is the new Cassie’s Confections bakery! Being in my own beautiful space has already been so inspiring!

Lastly, I read on a cake blog once that part of my online presence should include a bit of personal information, as people want to know me. I don’t usually do this, but I am taking it to heart this time and sharing a recent achievement that I am so proud of!

I have been training in Taekwondo for five years now. I started training with my dad (a black belt) and over time, three of my littles have joined me. They have so far achieved their red, blue, and white belt with yellow stripes. A couple of weeks ago, I earned my 2nd degree black belt!

belt

Here is one aspect of my test – I broke 3 boards at one time with a step-behind side kick.

middle

I love this special activity and exercise that I can do with my babies, and I truly believe that training AND cakes keep me motived for each other in a way.

Anyway, I’d love to hear your comments or questions on anything in this post! I’m hoping to get more videos up on YouTube soon, as my subscriber list is growing slowly but pretty steadily (if you have any video requests, please let me know!)! If you haven’t already subscribed, please do so here!

Cassiesignature

Some supplies used in this project:

Classes you might enjoy:

betterbuttercream

Wow, what a busy week it has been! I feel like I have barely had a moment to breathe, let alone stay on top of my social media and website. Phew!

I just wanted to share a fun woodland-themed baby shower cake that I was able to create this week!

woodlandfoxcake

Although I was exhausted from the 370 cookie order I also had to complete this week, and the cake I created the day before this one, I was able to relax and enjoy almost every moment of the making of this baby shower cake!

You all know that the mention of rustic, woodsy, “messy” type cakes often sends me into a slight bit of panic, but I think I handled this one pretty well!

woodlandfoxtoptier

The sweet little foxes gave me their share of trouble, but my wonderful husband assured me that they did, in fact, look like foxes. Now that is love, right? 😉

That beautiful birch tree tier is an image that I purchased on Etsy and printed as an edible image.

Now let me tell you something about edible images, friends… ain’t no shame in using them! I searched high. and. low. for the perfect image for this cake… I’m talking definitely more than one hour of scouring the internet using every search term I could think of to try to make Google understand my vision. That is not the easy way out, and a perfectly chosen and placed image in the perfect color can be the wow factor on your cake.

The bottom tier was my favorite!

woodlandfoxtrunktier

This tree trunk tier was a first for me also. A woodgrain impression mat, some awesome clay carving tools, and some hershey brown petal dust created this fun, slightly realistic yet slightly cute and whimsical tier.

I was pretty pleased with the final result!

woodlandfoxcake

Leave me a comment with questions about any other details of this cake and I am happy to answer!

Cassiesignature

Tools used in this project:

For some other fabulous tree trunk and bark methods, as well as many other texture tutorials, I recommend this class:

cleanandsimpleclass

A couple of weeks ago, I had the most wonderful opportunity to create a vintage airplane birthday cake for an incredibly loved little boy. From the moment his mom sent me a copy of the party invitation, I knew I was going to love this project! And I did… from start to finish.

airplanecakewm

The airplanes on the side of the cake are hand-painted with food coloring. I just love painting on cakes… it is so relaxing and creates such a wonderful look! I especially loved the dreamy clouds on this cake. Every once in a while, there is a project that reminds me of the magic of childhood, and this one did just that!

But of course the element that I enjoyed the most was the adorable airplane cake topper!

airplanetopperwm

This sweet topper was created from gum paste and was nearly all edible (minus the toothpicks). It traveled straight from my imagination to the top of this cake, and I adore it.

So much, in fact, that I created a video of the making of this topper!

Enjoy!

Cassiesignature

A few fabulous tools used in this project:

Craftsy Cake Decorating Class