Posts

This week I created a shoe-lover’s dream! A shoe… cake!

When a return customer contacted me to order a cake for his wife, I was thrilled because, as I told him, I love making grown-up girl celebration cakes! He then told me about his wife’s love for shoes and I knew this would be a fun one.

I had just one week prior seen an amazing magnetic shoe mold via a YouTube video and had to pull my finger away from the purchase button about three times, reminding myself that I had no immediate use for it. Side note: does anyone else find humor in the fact that I had to use self control not to buy a shoe mold?? That is a true cake decorator for you! I will count my husband lucky (and we won’t discuss my handbag addiction). 😉

Anyway, I immediately jumped back online and grabbed the shoe mold that had been my heart’s desire. When it arrived, I eagerly sliced open the box and ran downstairs to my bakery, and it only took me one wasted try before I found success!
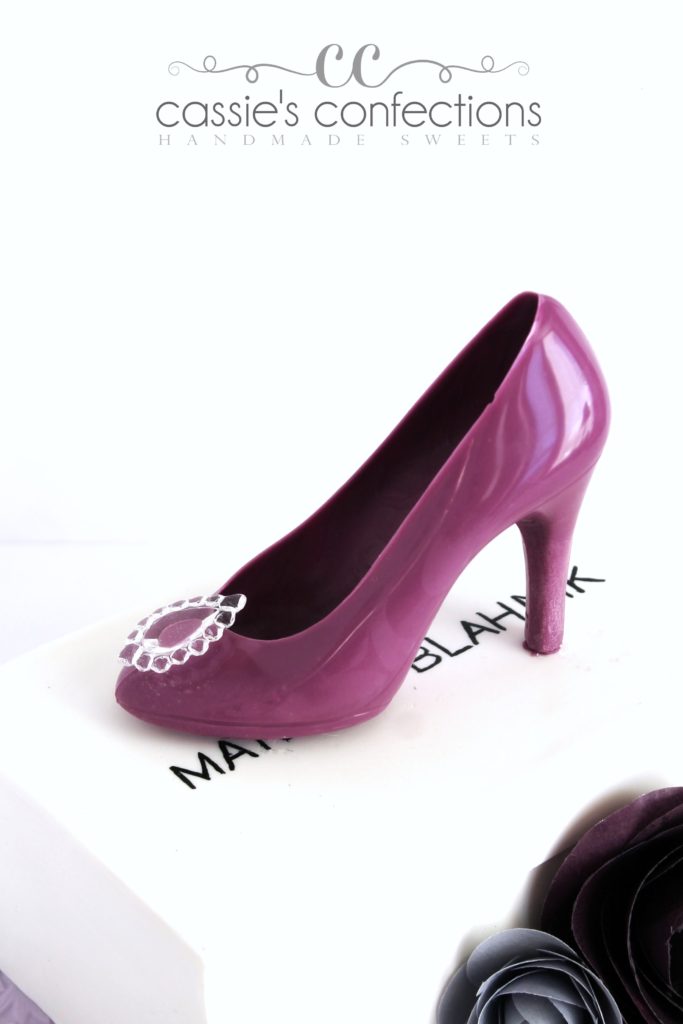
Isn’t that a seriously gorgeous, shiny, smooth piece of chocolate “designer” footwear? I added the edible jewel for more wow, and I’m really not sure if I wanted to eat it or wear it! Hopefully my customer felt conflicted in the same way.

I then created a “shoebox” cake in a similar manner to how I created last week’s chocolate box cake (you can watch the video here), but with modeling chocolate since my customer is not the biggest fan of fondant. I did a 50/50 mixture of modeling chocolate and fondant only for the top panel in order to be able to paint the logo on the top (food coloring beads up on modeling chocolate).

I used the fabulous wafer paper rose tutorial from Cakeheads.com to add a beautiful detail next to the shoe box. I printed my wafer paper two shades of purple using my edible printer.

I put the cake on a textured fondant cake board and was done!

This cake made my eyes happy!

Tools used in this project:

Classes you might enjoy:
While I could definitely get lost in a good stationary store, that is not what this post is about.

I really wanted to talk about the edible kind… frosting sheets! Wafer paper! Because the two make me just as giddy as (if not more than!) a brand new pad of pretty note paper.

Let’s be honest… when you think of edible images, you think of something like this…

edibleimagecake

Source: http://order.cakes.com

(Which is great! And also how grocery stores are able to charge what they do.)

In my time as a cake designer, I have really evolved in my thinking toward edible images and edible ink printers. I have graduated from feeling slightly embarrassed about owning an edible printer (feeling like maybe I am “cheating”) to loving every minute of it and always looking for opportunities to use it.

Why?

Because I have begun seen far beyond the colorful happy birthday sheet cake image, the simple Super Why image and the edible photo of the birthday child. I have seen the endless possibilities and the stunning details to be created using printed images and patterns!

Here is where it all began…

paisleyguitarcakewm

This was one of my first cake orders, and it was a little terrifying! My customer wanted a Brad Paisley guitar cake. I mean, paisley!?!?

But then I had an idea… and did a little online searching before running across the street to our grocery store to have them print this glorious paisley image. And the wow! People were even more impressed than I thought they would be!

So I began to dabble more…

teapartycake

And started to use images and printed patterns to enhance smaller details on my cakes.

hotwheelscakewm

Even going so far as to use printed wafer paper to decoupage, as in the top tier of my July 4th cake!

july4thcakefinal

I literally found an old copy of the Declaration of Independence, printed it on wafer paper and stuck pieces of it all over my cake… and that tier is one of my proudest.

It wasn’t until my polka dot cake that I finally let go of my inner struggles with using this simple medium.

polkadotcake

One of the cake designers that I admire most shared this cake to her page, and I couldn’t help but notice a comment on the post. Another cake decorator said something along the lines of “Well, it doesn’t look very difficult – just printed paper on a cake”. Which is true, and it was what I had been afraid of people thinking when she had first shared it… and her comment left me staring at my computer screen in confusion and embarrassment.

But then the wonderful cake designer replied to the comment. I don’t remember her exact words, but she basically responded that of course it was printed, but that it didn’t matter… and that a person knowing how to use their creativity, tools and resources to create something beautiful that makes people happy is a great talent in itself.

You cannot imagine what this did for me as a cake designer! I felt that I had been freed from everything that held me back from being proud of my cakes. No more secretly wondering if I had much talent beyond my tools. I was able to acknowledge the creativity and talent that it took to come up with an idea, seek out the tools and successfully create the cake. And I felt free to just have fun.

And now I happily seek out opportunities to add these unique touches to my cakes!

twowildcake

I am thrilled to have so many different mediums available to me, and I revel in the time spent discovering new ways to use them.

Cassiesignature

Tools used in this post:

Online classes you might enjoy:
waferflowersclass

waferflower2

waferflowers3

I could eat, sleep and breath cakes these days, and one of my very favorite aspects is the amazing and fun themes that my clients bring to me! From vintage rose first birthdays to sharks & strawberries (my adorable nephew’s choice) to pinwheels.

This week I was so thrilled to create a “Two Wild” themed cake! My incredibly fun returning customer wanted a jungle-themed cake using animal prints and black lace of some sort. She wanted it to be a bit more sophisticated than childish. This criteria was both incredibly fun and exciting, and also a little nerve-wracking! Animal prints can definitely be misused!

In continuing with my mission to discover my own style, I chose not to search online for examples (and to peek at the examples she sent me with squinty eyes). As I often do, I laid down on my back, closed my eyes and drew a picture in my head.

I still felt a bit unsure of the picture I had in my head, so I sketched it out just to make sure it was balanced.

twowildsketch

Thank goodness I can decorate a cake better than I can sketch, {and this particular sketch was done in haste and not meant to be seen} because the cake turned out much to my satisfaction!

twowildcake

I used edible lace throughout this buttercream cake {I will link to the lace and mat below}, as well as wafer paper, fondant, edible glitter AND icing sheets.

twowildcakebottom

In order to respect my customer’s wishes for a buttercream cake, I chose to apply the fondant decorations in a way that would be easy to remove – note on the bottom tier {in the photo above} that the fondant is attached loosely, separated from the cake by the lace and only attached at the base.

twowildcakebow

Lastly, McGreevy Cakes‘ wafer paper pom tutorial got me started on my wafer paper fan flowers, although I had to find my own way once I realized her amazing tutorial would not look so great with my one-sided printed paper.

twowildcakepoms

Below is a video of how I ended up creating my simple fan flowers!

Have a wonderful week! I would love to hear your comments!

Cassiesignature

Tools used in this project: